
Do you know that two out of every five websites use Wordpress?
According to W3Techs, the number of WordPress-based websites on the internet is 43.2%, making it the most popular content management system (CMS). So why should you migrate to Hubspot?
Let’s have a look at the features of Hubspot and Wordpress and then see, who wins?
SEO: Hubspot CMS comes with a SEO tool whereas WordPress doesn’t come with any. But in Wordpress, there are some plugins (paid and free) that you can use.
Analytics and reporting: In Hubspot CMS, you'll get all the analytics you need to measure the performance of your website and ROI. The CRM platform is already integrated into Hubspot, giving you deeper insights into the analytics. While reporting in WordPress is limited to page views mostly. For a deeper understanding of the website, you’ll need to integrate other features.
All in one platform: In Hubspot CMS, you’ll get all the required tools to offer a seamless digital experience to your customer and content management system to you. Whereas in WordPress, you’ll need to use different plugins, which means more cost, management, time, and headache.
Personalization: With HubSpot CMS, you can create personalized content and emails for a variety of demographics. In contrast, WordPress doesn't offer any options for creating personalized content.
Well, who wouldn't want a seamless website management experience?? That’s what Hubspot gives you: a seamless and better experience along with personalization.
Imagine having a website with such features. It sounds like a dream, but Hubspot can make it possible for you. Without wasting any more seconds, let’s understand the process of migrating from Wordpress to Hubspot.
Roadmap to Migrate from Wordpress to HubSpot
Audit & review your current website
The first and foremost step is to review your current website and see which features you want to migrate to your new website and which ones you don’t want to keep.
Let’s first understand why it is important to do that. When migrating the content of your website, you probably don't want to lose traffic or jeopardize user experience. That’s where the audit comes in. This will help you figure out your important content, user journey, and points of interaction for your users. You'll be able to prioritize which features, content you want to migrate, as well as do a cleanup using this information.
But to do that, you've got to do a complete audit of your website by analyzing consumer behavior. This includes, what feature isn’t working at all or benefiting you, what your users are liking, what type of content or campaign do they like the most. This would give you an idea of what you should keep or remove.
This is an important step to consider. It’ll help you revamp your website. There are a few tools available out there, which can help you analyze your website. One such tool is Google Analytics. You can find more tools.
Create a list of the features and pages
What if you end up forgetting which feature you want to migrate or build on your new website?
To avoid that, create a list of all the features and pages that you want. Your audit should give a list of features, pages, interactions that are important for your website. In this step, you can document all of that and do any more brainstorming you need to do. You can also think of ways to fill any new content gaps that you found during your audit.
We’d suggest you create a list in Excel or Spreadsheets and start adding features to it.
You can initially start with a few common pages, such as homepage, about page, product page, contact page, etc. So that you don’t end up missing out on any basic stuff. Keep on adding more features as you go.
Select a template or a theme
After deciding on what pages and features you want to have, select a template or theme for your new website. Whether you want to use the current template, or hire a developer to customize a template, or purchase pre-made templates, select a template before moving the content to Hubspot. However, there are more than 100 themes available on Hubspot, you can choose from them if you’re looking to purchase pre-made templates. There are both free and paid templates available.
Important thing to consider here is that your website content/messaging comes first and then the theme. Basically adapt your theme as per your content and messaging instead of vice-versa.
Move the website page and landing page content of your current website
Now the main job starts, migration of the content of your current website. The content includes all those shortlisted pages and features that you initially decided to move. We’d suggest you refer to the sheet you created to track the migration process for pages.
You can start adding pages on your own. Here’s how you can do that:
- To do that, go to Marketing > Landing Pages in your HubSpot account.
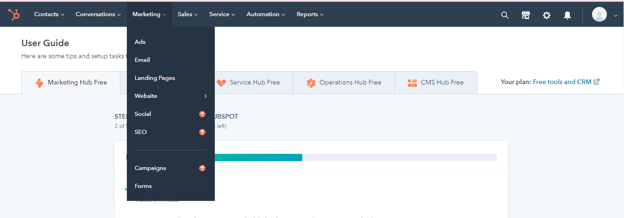
- Then click on Create button and select from Landing Page and Website Page.
- Choose the type of page you want to create and give it a name.
- Start designing your page by selecting a template provided by your theme.
- After you complete it, you can move on to the next step.
Migrate your Wordpress blogs to HubSpot
Now you know all the steps which you need to follow in order to migrate the content from WordPress to Hubspot, let’s have a look at how you can migrate your blogs to Hubspot:
- Login to your Hubspot account.
- Go to the Settings icon in the main navigation bar.
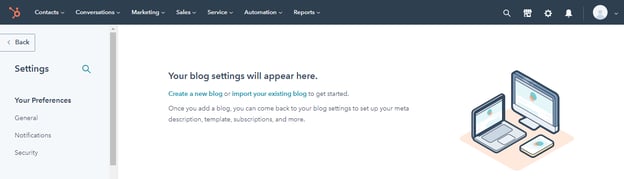
- Select the Website > Blog option from the left sidebar menu.
- Click on the
Import your existing blog.
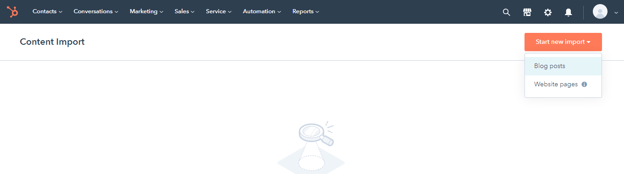
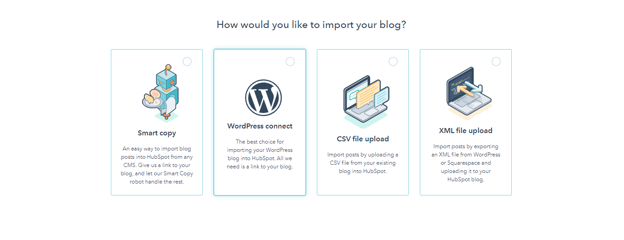
- Select Start New Import and then choose the Blog Posts option.
- Select Wordpress connect and then, select next.
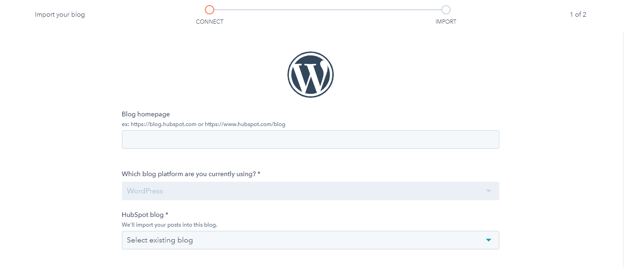
Enter the URL of your blog's listing page in the blog homepage field, select the Blog platform, and then choose the Blog you want to import your blog into.
- After that, click on Copy blog posts.
- The migration of the Wordpress blog will begin and may take some time depending on the number of posts.
Along with the blogs, other details would also be imported in the Wordpress blog migration process:
- Title: The title of your blog post.
- SEO title: The title displayed in search results (Google).
- Author: The name of the author.
- Publish date: The date when your blog was published.
- Featured image: The image that was used in your blog post.
- Categories/Tags: The tags and categories you added to your blog post.
- Meta description: The short description that appears in search results about your blog post.
- Post body: The main content.
Add redirects and connect domain
Once you’re done moving the content, you’d want to make sure that people are able to find your new website. For that, you need to connect the domain and add redirects to your brand-new website.
First step is to connect the primary domain. Here’s how you can do it:
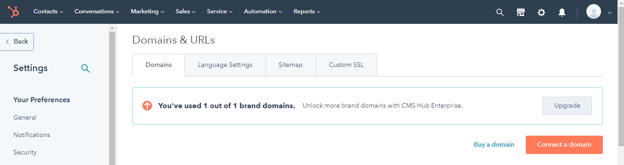
- Go to your Hubspot portal settings in the main navigation bar.
- Navigate to Website > Domains & URLs and select Connect a domain button.
- After that, select the primary domain, then enter the domain name and follow the steps. Until you reach the page about updating DNS records.
- Updating DNS records: In this step, you need to make changes at your current domain registrar. You can either do it manually or sometimes HubSpot can do it automatically for you once you authorize it to do so. To do it manually, you have to login to your DNS provider to access your DNS records. If you don’t have access or are not sure of anything, reach out to your IT team.
Once you update your DNS records, they’ll be verified within 15-80 minutes. After that, the pages that you created will start redirecting to your domain.
Next step is to add the redirect domain (from non-www to www version): https://www.marketingallday.com/knowledge/redirect-core-domain-to-sub-domain-in-hubspot
Now, you can move all your URL redirects that you had in Wordpress into HubSpot CMS. Using a redirect will help search engines find your content on your newly created site. These redirects will go live once the domain goes online in HubSpot. Here’s how you can add redirects:
Login to your Hubspot account and click on the Settings button in the main navigation bar.
- Navigate to Website>Domains & URLs.
- Click on the URLS redirects tab, then select Add URL redirect .
- After that, select the Standard or Flexible redirect type, then enter the full URL that you want to redirect in the original URL field.
- In the Redirect to field, enter the URL of the page you want the original URL to lead to.
- Click Add URL redirect.
You can also bulk import these redirects from the URL redirects tab. Once you’re done updating everything, you’ll have to start the most important part, testing.
Testing
Testing is the most important part of any process. You may want to refer to the spreadsheets/excel you created initially to ensure that you haven't missed out on anything. Do some quality assurance checks, such as test the design, URLs, meta, and other features to check everything is working smoothly. And voila, you’re finally done setting up your new website.
Phew! It was definitely a lengthy process, but it’s definitely worth the time. Hubspot has far more personalized features in comparison to WordPress. If you’re planning to migrate your current website to Hubspot, then make sure to create an excel sheet to track all the steps. This will ensure that you don’t miss out on anything. As you’ve just noticed, migrating a website from one CMS to another involves a lot of steps. And we bet you don’t want to mess up your new website.